
Add speech-to-text options to your note-taking, chat, meeting or many other types of apps, so your users can skip manual typing in your .NET MAUI app.
For several years, a common problem for mobile device users has been typing text quickly. Although innovative features such as swipe typing and word autocompletion have been implemented, undoubtedly one of the most comfortable methods remains voice dictation.
In .NET MAUI, you can take advantage of the Progress Telerik UI for .NET MAUI SpeechToTextButton control, which allows converting speech to text. Let’s see how to use it in your own .NET MAUI apps!
Getting to Know the Telerik SpeechToTextButton Control for .NET MAUI
The SpeechToTextButton control uses platform-specific voice recognition services to perform speech-to-text conversion, including WinUI. The structure of the control is simple, and it is based on a button composed of a SpeechToTextButton Content and a SpeechToTextButton, which you can see in the following image:
Some possible use cases for the control are:
- Voice note-taking
- Chat applications
- Voice search
- Command control via voice
- Meeting transcription
- Among many others
In reality, the range of use cases is quite large. Now let’s analyze the control in more depth.
Creating a Practical Case
Let’s start by creating a demo application, which will help us see the different features of the speech-to-text control. The idea of the application is to be a personal note-taking app that allows actions like editing text, saving notes and sharing them.
For this example, we’ll use the CommunityToolkit.Mvvm package, which allows for rapid creation of view models. Below, I show you the initial code for the application in case you want to replicate it, which is as follows:
TextEditorPage.xaml:
<Grid
    Padding="20"
    RowDefinitions="Auto, Auto, *, Auto"
    RowSpacing="16">


    <Label
        FontAttributes="Bold"
        FontSize="28"
        Text="Fast Note"
        TextColor="#1A1A2E" />


    <Border
        Grid.Row="1"
        Padding="16,12"
        BackgroundColor="#F3F4F6"
        StrokeShape="RoundRectangle 12"
        StrokeThickness="0">
        <Grid ColumnDefinitions="Auto, *, Auto">
            <Label
                Grid.Column="2"
                FontSize="12"
                Text="{Binding CharacterCount}"
                TextColor="#9CA3AF"
                VerticalOptions="Center" />
        Grid>
    Border>


    <Border
        Grid.Row="2"
        Padding="0"
        BackgroundColor="#FFFFFF"
        Stroke="#E5E7EB"
        StrokeShape="RoundRectangle 16"
        StrokeThickness="1">
        <Grid RowDefinitions="*, Auto">
            <Editor
                x:Name="MainEditor"
                Margin="16"
                AutoSize="TextChanges"
                BackgroundColor="Transparent"
                FontSize="16"
                Placeholder="Start typing or use voice input..."
                PlaceholderColor="#9CA3AF"
                Text="{Binding EditorText, Mode=TwoWay}"
                TextColor="#1F2937" />


            <Border
                Grid.Row="1"
                Padding="12,0"
                BackgroundColor="#F9FAFB"
                HeightRequest="56"
                StrokeThickness="0">
                <Grid ColumnDefinitions="*, Auto, Auto">

                    <VerticalStackLayout VerticalOptions="Center">
                        <Label
                            FontSize="12"
                            Text="{Binding WordCount}"
                            TextColor="#6B7280" />
                    VerticalStackLayout>


                    <Button
                        Grid.Column="1"
                        Padding="12,8"
                        BackgroundColor="Transparent"
                        BorderWidth="0"
                        Command="{Binding ClearTextCommand}"
                        FontSize="14"
                        IsEnabled="{Binding HasText}"
                        Text="Clear"
                        TextColor="#EF4444" />


                    <Button
                        Grid.Column="2"
                        Padding="12,8"
                        BackgroundColor="Transparent"
                        BorderWidth="0"
                        Command="{Binding CopyTextCommand}"
                        FontSize="14"
                        IsEnabled="{Binding HasText}"
                        Text="Copy"
                        TextColor="#3B82F6" />
                Grid>
            Border>
        Grid>
    Border>


    <Grid
        Grid.Row="3"
        ColumnDefinitions="*, *, *"
        ColumnSpacing="12">
        <Button
            BackgroundColor="#E5E7EB"
            BorderWidth="0"
            Command="{Binding NewDocumentCommand}"
            CornerRadius="10"
            FontSize="14"
            HeightRequest="44"
            IsEnabled="{Binding HasText}"
            Text="New"
            TextColor="#374151" />
        <Button
            Grid.Column="1"
            BackgroundColor="#10B981"
            BorderWidth="0"
            Command="{Binding SaveTextCommand}"
            CornerRadius="10"
            FontSize="14"
            HeightRequest="44"
            IsEnabled="{Binding HasText}"
            Text="Save"
            TextColor="#FFFFFF" />
        <Button
            Grid.Column="2"
            BackgroundColor="#8B5CF6"
            BorderWidth="0"
            Command="{Binding ShareTextCommand}"
            CornerRadius="10"
            FontSize="14"
            HeightRequest="44"
            IsEnabled="{Binding HasText}"
            Text="Share"
            TextColor="#FFFFFF" />
    Grid>

Grid>
TextEditorPage.xaml.cs:
public partial class TextEditorPage : ContentPage
{
    private readonly TextEditorViewModel _viewModel;

    public TextEditorPage()
    {
        InitializeComponent();
        _viewModel = new TextEditorViewModel();
        BindingContext = _viewModel;
    }
}
TextEditorViewModel.cs:
public partial class TextEditorViewModel : ObservableObject
{
    [ObservableProperty]
    [NotifyPropertyChangedFor(nameof(CharacterCount))]
    [NotifyPropertyChangedFor(nameof(WordCount))]
    [NotifyPropertyChangedFor(nameof(HasText))]
    private string _editorText = string.Empty;

    [ObservableProperty]
    private string _statusText = "Ready";

    [ObservableProperty]
    private Color _statusColor = Colors.Gray;

    public string CharacterCount => $"{EditorText?.Length ?? 0} characters";

    public string WordCount
    {
        get
        {
            int words = string.IsNullOrWhiteSpace(EditorText)
                ? 0
                : EditorText.Split([' ', '\n', '\r'], StringSplitOptions.RemoveEmptyEntries).Length;
            return $"{words} words";
        }
    }

    public bool HasText => !string.IsNullOrEmpty(EditorText);

    #region Commands

    [RelayCommand]
    private void ClearText()
    {
        EditorText = string.Empty;
        UpdateStatus("Text cleared", null);
    }

    [RelayCommand]
    private async Task CopyTextAsync()
    {
        if (!HasText) return;

        await Clipboard.Default.SetTextAsync(EditorText);
        UpdateStatus("Copied to clipboard", "#10B981");

        await Task.Delay(2000);
        UpdateStatus("Ready", null);
    }

    [RelayCommand]
    private async Task NewDocumentAsync()
    {
        if (HasText)
        {
            if (Application.Current?.Windows.FirstOrDefault()?.Page is Page page)
            {
                bool confirm = await page.DisplayAlertAsync("New Document",
                    "Do you want to create a new document? Current text will be lost.",
                    "Yes", "No");

                if (!confirm) return;
            }
        }

        EditorText = string.Empty;
        UpdateStatus("New document created", "#10B981");
    }

    [RelayCommand]
    private async Task SaveTextAsync()
    {
        var page = Application.Current?.Windows.FirstOrDefault()?.Page;
        if (page == null) return;

        if (!HasText)
        {
            await page.DisplayAlertAsync("Save", "There is no text to save.", "OK");
            return;
        }

        try
        {
            string fileName = $"VoiceNote_{DateTime.Now:yyyyMMdd_HHmmss}.txt";
            string filePath = Path.Combine(FileSystem.AppDataDirectory, fileName);

            await File.WriteAllTextAsync(filePath, EditorText);

            UpdateStatus("Document saved", "#10B981");

            await page.DisplayAlertAsync("Saved", $"Document saved as {fileName}", "OK");
        }
        catch (Exception ex)
        {
            await page.DisplayAlertAsync("Error", $"Could not save document: {ex.Message}", "OK");
        }
    }

    [RelayCommand]
    private async Task ShareTextAsync()
    {
        if (!HasText)
        {
            if (Application.Current?.Windows.FirstOrDefault()?.Page is Page page)
            {
                await page.DisplayAlertAsync("Share", "There is no text to share.", "OK");
            }
            return;
        }

        await Share.Default.RequestAsync(new ShareTextRequest
        {
            Text = EditorText,
            Title = "Share Voice Note"
        });
    }

    #endregion

    #region Helper Methods

    private void UpdateStatus(string text, string? colorHex)
    {
        StatusText = text;
        StatusColor = string.IsNullOrEmpty(colorHex) ? Colors.Gray : Color.FromArgb(colorHex);
    }

    public void UpdateButtonState(Telerik.Maui.SpeechRecognizer.SpeechRecognizerState state)
    {
        switch (state)
        {
            case Telerik.Maui.SpeechRecognizer.SpeechRecognizerState.Listening:
                UpdateStatus("Listening...", "#2563EB");
                break;
            case Telerik.Maui.SpeechRecognizer.SpeechRecognizerState.Initializing:
                UpdateStatus("Initializing...", "#F59E0B");
                break;
            default:
                UpdateStatus("Ready", null);
                break;
        }
    }

    #endregion
}
The above code results in the following application when executed:
In the previous image, you can see the application, which only allows taking notes via the keyboard, which can be tedious, slow and boring. Therefore, we will use the speech-to-text control to improve quick note-taking.
Integrating the SpeechToTextButton Control into the Application
The first thing you need to do to use the speech-to-text control is to follow the Telerik .NET MAUI controls installation guide. Once you have done that, add the following namespace in the ContentPage where you want to use the control:
xmlns:telerik="http://schemas.telerik.com/2022/xaml/maui"Next, add the control using the RadSpeechToTextButton tag where you want to place it; in our example, it will be located where the Editor Toolbar comment is:
<telerik:RadSpeechToTextButton
    x:Name="SpeechButton"
    Grid.Column="3"
    VerticalOptions="Center" />
Since we will be using the microphone in the app for obtaining the transcription, you need to grant the required permissions according to the platform to allow audio recording and voice recognition. For example, for Android, you need to add the following line to AndroidManifest.xml:
The integration of the control provides a button with the necessary functionality to start the speech-to-text process:
In the image above, you can see that when the button to start recording is pressed, the microphone is automatically activated in the status bar (if it’s the first execution, it will likely ask for microphone access), indicating that a recording process has started.
Now we need to handle the events or commands to obtain the transcription, which we will see next.
Available Events and Commands in the Speech to Text Control for .NET MAUI
The speech to text control has events and commands that we can use to react to different situations. For the events, we have the following available:
SpeechRecognized: This occurs when there is a successful speech recognition and includes an argumentSpeechRecognizerSpeechRecognizedEventArgs, which contains theFullTextobtained from the recognition andFullTextConfidenceScoreindicating the confidence level of the recognition.ErrorOccurred: This occurs when there is an error in the recognition process, includes the argumentSpeechRecognizerErrorOccurredEventArgs, which contains theMessageproperty with the error message, theExceptionassociated with the error andHandledto determine if the error has been handled.StateChanged: This is fired as soon as there is a change in the state of the speech recognizer.
On the other hand, we also have some commands that will allow us to handle events directly from the viewmodel if we need to, as is the case for us. To achieve this, we can modify the label of the RadSpeechToTextButton control by adding the commands SpeechRecognizedCommand and ErrorOccurredCommand as shown in the following example:
 <Border...>
    <Grid ColumnDefinitions="*, Auto, Auto, Auto">
        ...
        <telerik:RadSpeechToTextButton
            x:Name="SpeechButton"
            Grid.Column="3"
            ErrorOccurredCommand="{Binding ErrorOccurredCommand}"
            SpeechRecognizedCommand="{Binding SpeechRecognizedCommand}"
            VerticalOptions="Center" />
    Grid>
 Border>
Next, we need to handle the commands from the viewmodel as seen below:
#region Speech Recognition Commands

[RelayCommand]
private void SpeechRecognized(SpeechToTextButtonSpeechRecognizedCommandContext context)
{
    EditorText = context.FullText;
    UpdateStatus("Speech recognized", "#10B981");
}

[RelayCommand]
private async Task ErrorOccurredAsync(SpeechToTextButtonErrorOccurredCommandContext context)
{
    UpdateStatus("Error occurred", "#EF4444");

    if (Application.Current?.Windows.FirstOrDefault()?.Page is Page page)
    {
        await page.DisplayAlertAsync("Voice Input Error",
            $"Unable to process voice input: {context.Message}",
            "OK");
    }
}

#endregion
In the previous code, you can see that the commands receive contexts similar to the arguments of the events. The first, SpeechToTextButtonSpeechRecognizedCommandContext, allows obtaining the FullText and FullTextConfidenceScore when there is speech recognition. The second, SpeechToTextButtonErrorOccurredCommandContext, contains the Message and Exception properties when there is an error in the speech recognition.
You can also see how FullText is assigned to the EditorText property, which is bound to the control of type Editor. This allows the transcription obtained to be displayed in the graphical interface, resulting in the following execution:

Now we can obtain the transcription; however, there is a need for visual indicators that allow users to know what is happening in the application, and we can solve this through the states of the control. Let’s see how.
States of the Speech-to-Text Control
One thing that is appreciated as a developer is that Progress Telerik documentation is very clear regarding the architecture and lifecycle of the .NET MAUI SpeechToTextButton control, as can be seen in the following image:
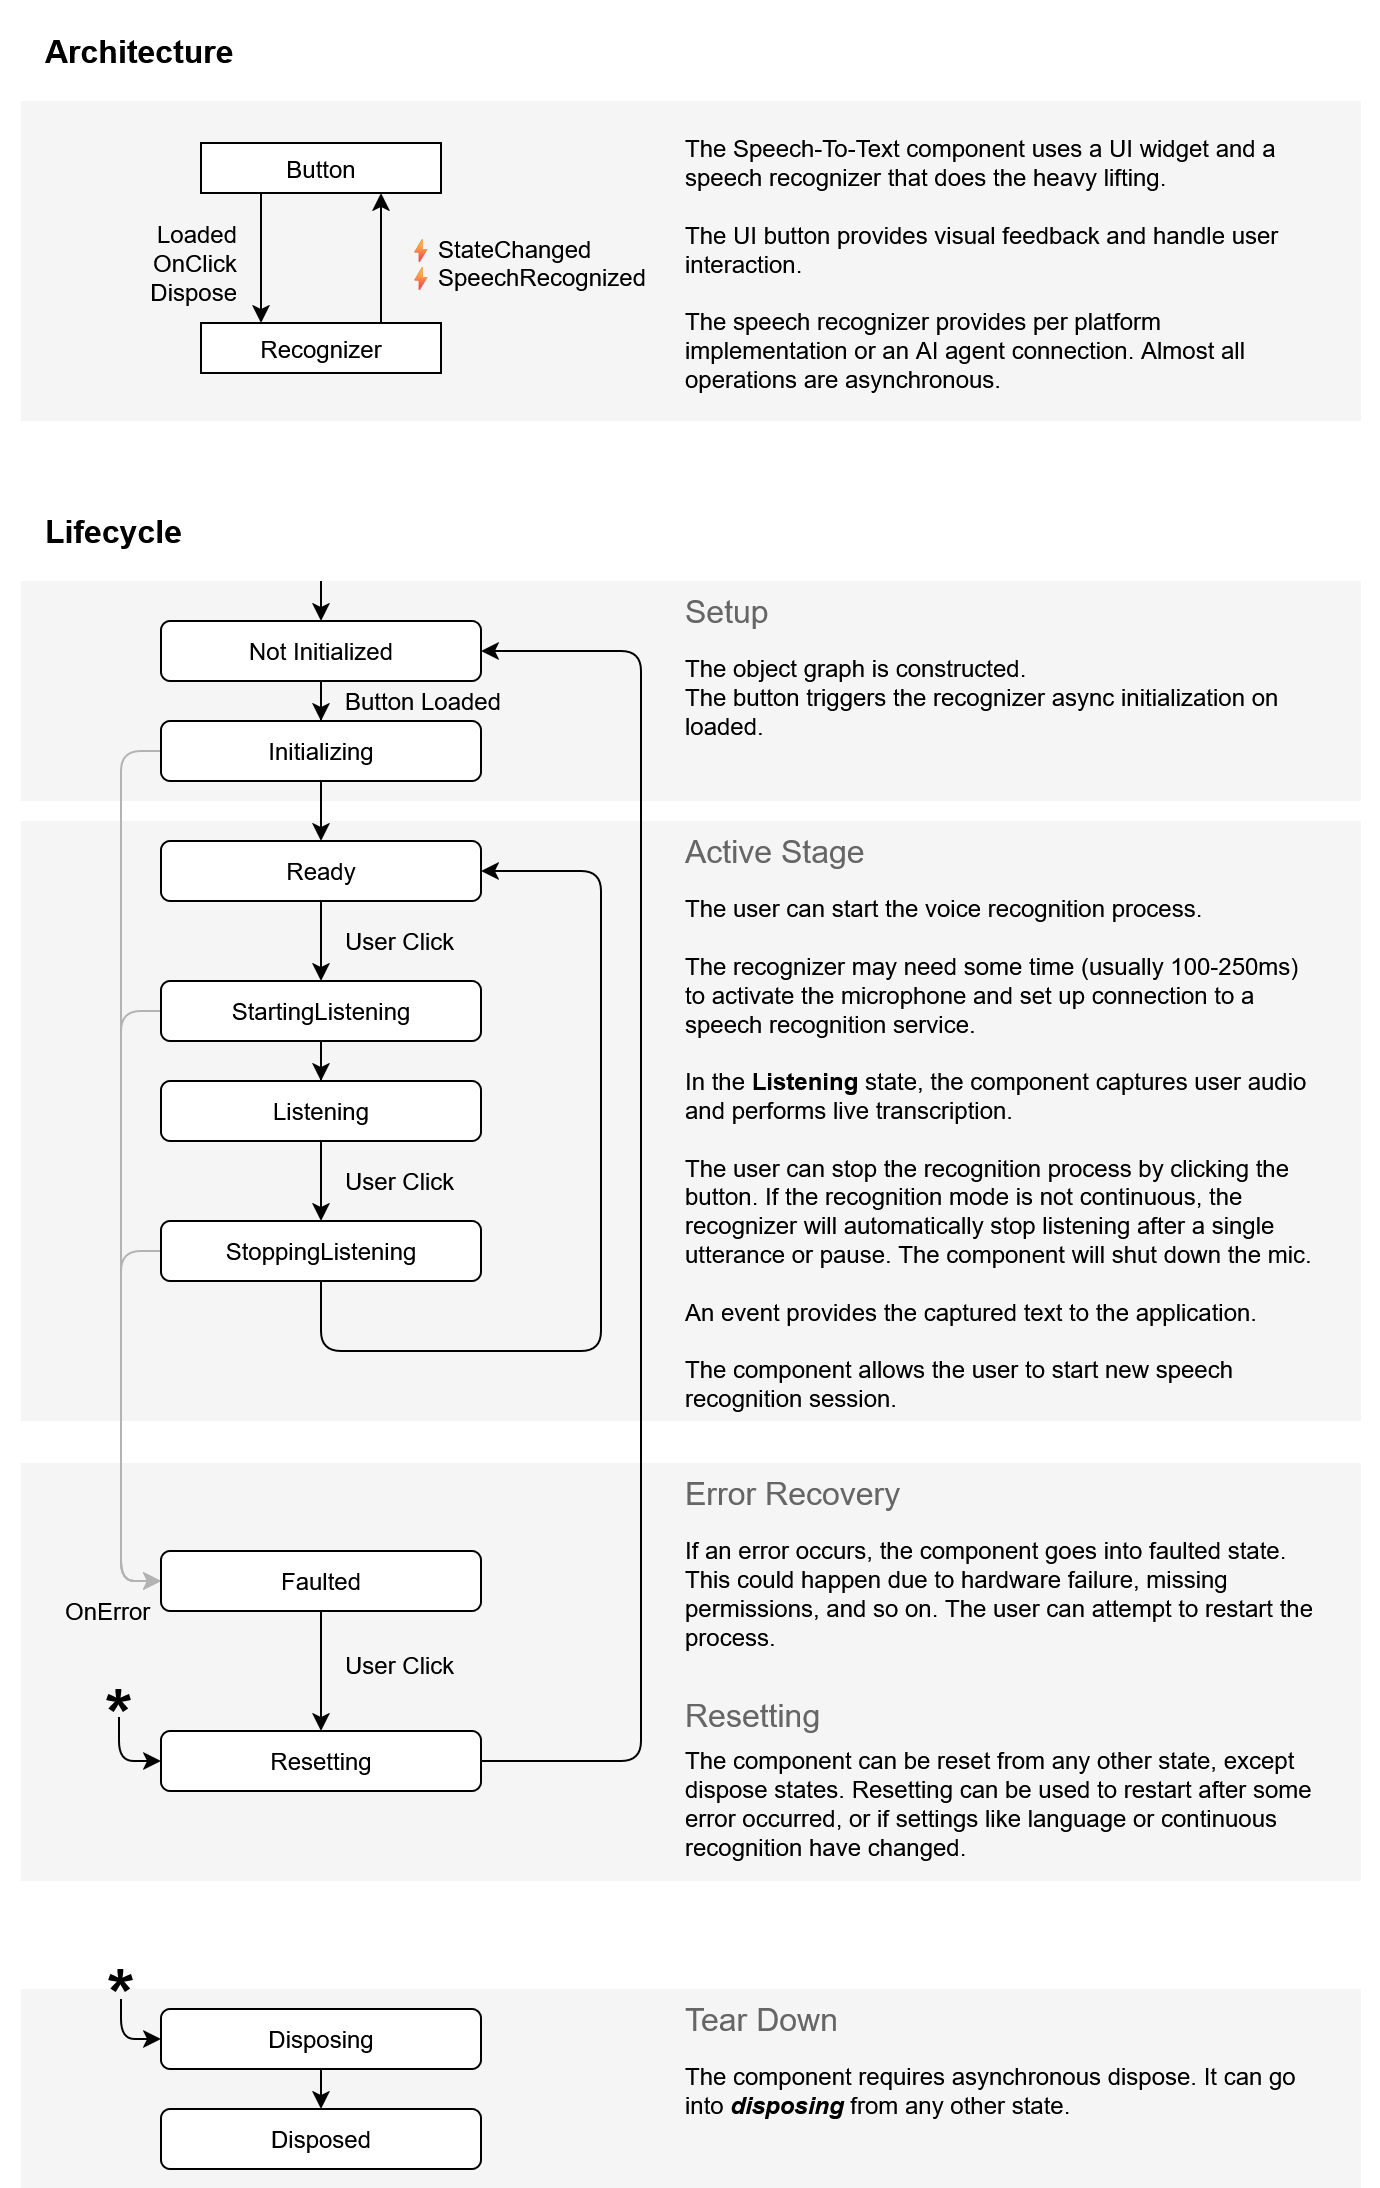
The diagram above shows us a series of states that we can detect thanks to the StateChanged event as seen below:
<telerik:RadSpeechToTextButton
    x:Name="SpeechButton"
    Grid.Column="3"
    ErrorOccurredCommand="{Binding ErrorOccurredCommand}"
    SpeechRecognizedCommand="{Binding SpeechRecognizedCommand}"
    StateChanged="OnStateChanged"
    VerticalOptions="Center" />
In the code behind, we can invoke a method from the viewmodel that allows us to determine what to do with the detected state:
private void OnStateChanged(object sender, EventArgs e)
{
    if (sender is RadSpeechToTextButton button)
    {
        MainThread.BeginInvokeOnMainThread(() =>
        {
            _viewModel.UpdateButtonState(button.State);
        });
    }
}
Within the viewmodel, we will compare the desired state using any of the states defined in the Telerik.Maui.SpeechRecognizer.SpeechRecognizerState enumeration.
For example, to react to state changes Listening and Initializing, the code would be as follows:
public void UpdateButtonState(Telerik.Maui.SpeechRecognizer.SpeechRecognizerState state)
{
    switch (state)
    {
        case Telerik.Maui.SpeechRecognizer.SpeechRecognizerState.Listening:
            UpdateStatus("Listening...", "#2563EB");
            break;
        case Telerik.Maui.SpeechRecognizer.SpeechRecognizerState.Initializing:
            UpdateStatus("Initializing...", "#F59E0B");
            break;
        default:
            UpdateStatus("Ready", null);
            break;
    }
}
Finally, in the graphical interface code, we can add visual indicators that provide feedback to the user about the state of the control. In our example, we do this in the comment section Status Bar:
<Border
    Grid.Row="1"
    Padding="16,12"
    BackgroundColor="#F3F4F6"
    StrokeShape="RoundRectangle 12"
    StrokeThickness="0">
    <Grid ColumnDefinitions="Auto, *, Auto">
        <Ellipse
            BackgroundColor="{Binding StatusColor}"
            HeightRequest="10"
            VerticalOptions="Center"
            WidthRequest="10" />
        <Label
            Grid.Column="1"
            Margin="12,0,0,0"
            FontSize="14"
            Text="{Binding StatusText}"
            TextColor="#374151"
            VerticalOptions="Center" />
        <Label
            Grid.Column="2"
            FontSize="12"
            Text="{Binding CharacterCount}"
            TextColor="#9CA3AF"
            VerticalOptions="Center" />
    Grid>
Border>
Once the previous code has been replaced, we will graphically see the state changes, to indicate to users that the component is ready to start transcription, if it is listening to speech or if speech has been recognized correctly:
In the above image, you can see the state changes in action, according to the actions performed by the user on the speech to text control.
Conclusion
Throughout this article, you have been able to learn about the SpeechToTextButton control from Telerik for .NET MAUI applications.
Implementing this type of component in your mobile applications can greatly simplify the friction that exists with users when it comes to entering lengthy or rapid text, something very trendy today with AI-based apps. I encourage you to try it out and help your users get the most out of your applications.
If you aren’t already using Telerik UI for .NET MAUI, it comes with a free 30-day trial: